
“Easy Button” Product Attributes in Woocommerce

Adding products to your WooCommerce store is extremely easy and in my last article I stepped you through that process. However, if you aren’t adding product attributes, or don’t know how, you’re missing a huge piece of the puzzle.
What exactly is a product attribute and why is it important?
An attribute is a characteristic of a product, like size, color, length, etc. If you’ve ever shopped on Amazon, you know that sometimes you’re asked to choose your colors and sizes on products in order to click ADD TO CART. Those are attributes.
Entering a master list of attributes is important because, obviously, you only want to have to enter them ONCE. Entering them over and over for every single item is just a waste of time and pure drudgery — by entering them once, you’re free to move on to other more important tasks.
This master list concept in Woocommerce will do that for you. Have a look at the screenshot below.
 This is where you enter the all-important master list of product attributes.
To get to this screen from your WordPress Dashboard, look down on the left side column and hover your mouse over PRODUCTS, then click on ATTRIBUTES when it pops out. Voila.
This is the big, red EASY button when it comes to Woocommerce products.
You have arrived at a very good place. Why? Because this is your master list of all product attributes.
It is here that you set up all the attributes for every product you will ever sell, both now and in the future. So do this. Think of all the colors of all the apparel that you will sell – the colors of the t-shirts, the colors of the sweats, the colors of all the skirts, etc. You get what I mean. If it’s a current or future color of any of your products, put it here.
A useful exercise would be to think of those kinds of things with your own products. What kinds of attributes do your own products have?
(And should you miss entering an attribute on the first go-round, you can always come back to this screen later and add them.)
Using this picture above for reference, let me step you through how to create the attribute of “size,” as one example. In the Name box, enter the word “Size”. Skip the Slug box as that just gets created automatically. Then In the Type box, choose Select, not Text. Select allows pre-configured terms in a drop-down list – the list of terms you are creating, like S, M, L, and XL.
Be sure “custom ordering” is selected, so you can put things in order on your drop down for the user. You wouldn’t want your drop down for size to look like this: M S XL L You would want to be able to put it into the right order so that it makes sense to the user, and “custom ordering” gives you that capability. Then simply click the ADD ATTRIBUTE button.
Once your attribute is created and shows on the upper right, like the screen shot above shows, then we have the task of actually creating (configuring) the terms for the Sizes.
To do this, click on the small gear symbol in a square next to Size on the far right. This will take you to this screen below:
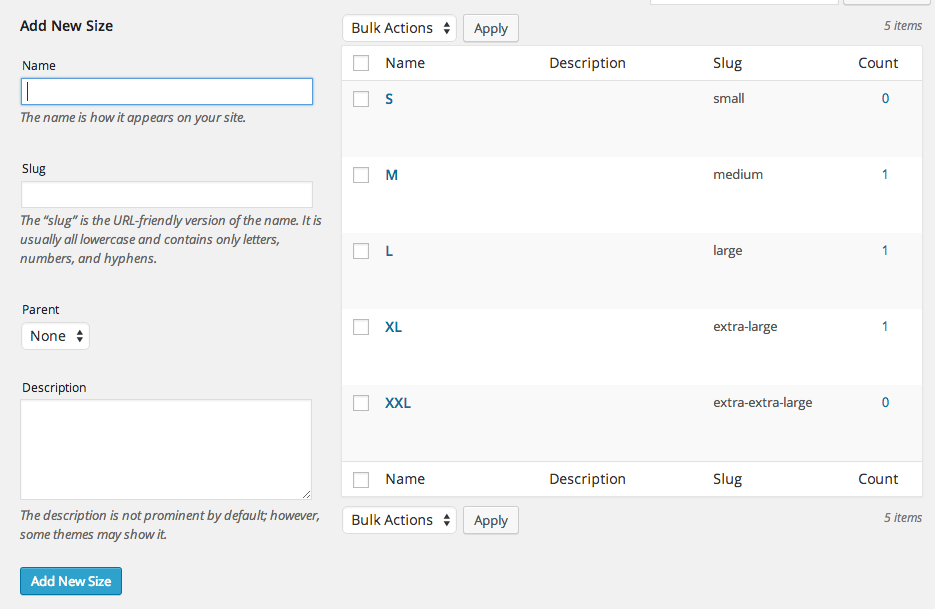
This interface is where you add the actual terms of the attribute of size, like Small, Medium, Large and Extra-Large. So to create the “S” term standing for small, do the following: In the Name Box, enter “S”Skip the slug box, parent box, and description box Then click on the Add New Size button. You should then see S appear at the top of the box on the right.
However if you entered terms in the wrong order, like say “M” first, then you would want to re-order them. If you did not have “Custom ordering” turned on in the previous screen you would not be able to re-order these terms. Simply drag and drop them into the order, top to bottom, that you want them to appear in the user’s drop down box when they select it out on the frontend.
Enter all your sizes and add them with the button. And that’s all there is to it!
Now you can add those attributes and terms when you’re adding simple, grouped, external, or variable products back out at the Add Product interface, which is a process covered in the previous article.
As you can see WooCommerce is elegant yet powerful beast. It has so many common sense features and so many options that not many eCommerce platforms can hold a candle to it.
When considering what to implement as your next eCommerce platform, you should look long and hard at this sophisticated solution. It’s feature-packed, easy, and best of all, it’s FREE. (And who doesn’t like free?)
Tagged best ecommerce websites, Customer Experience, eCommerce, online product catalogs, product recommendations


Thank you for information