How to Set Up Ecommerce Tracking on Google Analytics

Google Analytics is one of the most popular tools for measuring how your site is performing but you probably aren’t using one its best features: ecommerce tracking. Ecommerce tracking allows to measure exactly what your customers are purchasing and then use that data to see which marketing channels are really bringing in the sales. The only catch? It can be really hard to setup.
Ecommerce tracking is a marketers dream come true. Automatically track sales data such as revenue, which items customers buy, sales brought in by affiliates, and much more. Then take that data and see how the most profitable customers got to your site. This can easily show you where you should spend more money and time and where you need to cut your losses.
Now setting up ecommerce tracking in Google Analytics can be a challenge, especially if you aren’t a developer yourself. Let’s start with an easy step, turning it on in your Google Analytics dashboard. To do this:
- Go to your Google Analytics dashboard
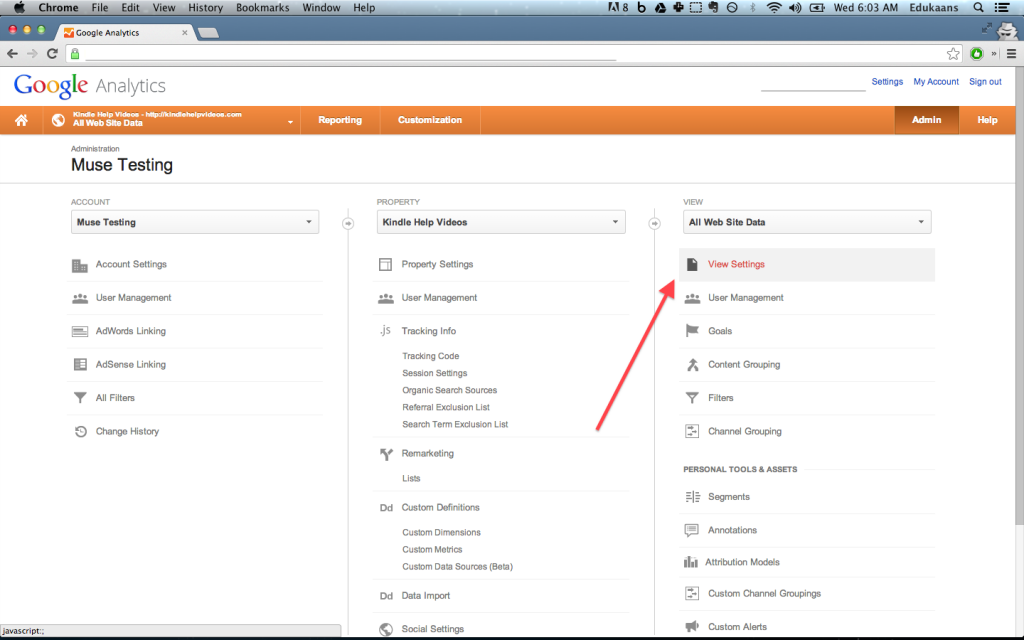
- Click the “Admin” button in the top right
- Choose the right account and the corresponding property
- Under View, click “View Settings”
- Toggle the on switch for Ecommerce tracking

Now, your website needs to send the ecommerce data to Google Analytics which is were things get complicated. There are few plugins out there that make the next few steps a breeze. If you’re using or are able to use any of the following plugins or software, then you don’t need to worry about setting up ecommerce tracking.
Shopify
Shopify will automatically do all the backend work to send the ecommerce data to Google Analytics. All you need to is to turn it on through the steps I listed above. For more information, visit this link: http://docs.shopify.com/manual/settings/general/google-analytics
Cart66
Cart66 is a popular shopping cart plugin for WordPress. They also support ecommerce tracking out of the box without having you to do any of the hard work. You simply add your property id (starts with a UA-) and you are ready to go. For more information, visit this link: http://docs.cart66.com/knowledgebase/integrations/#google-analytics-ecommerce-tracking
WooCommerce
Another popular ecommerce plugin for WordPress also support ecommerce tracking out of the box. For more information, visit this link: http://docs.woothemes.com/document/configuring-woocommerce-settings/#section-9
Manual Setup
If none of the above options work for you, then perhaps the manual approach is the way to go. I won’t go into every little detail needed to make the integration work especially since Google has a great guide here: https://developers.google.com/analytics/devguides/collection/analyticsjs/ecommerce. I will however, give you a short overview of what’s required.
The integration happens through Javascript so you will need to combine some server-side code with your client side setup.
1. You will need to activate the ability to send ecommerce information. You do that by calling the following line. You need to call it after your main Google Analytics code and before you start making any ecommerce specific calls.
ga('require', 'ecommerce', 'ecommerce.js');
2. There are two options for sending data. One is called a “Transaction” and the other are called “Items”. Transactions can be seen as the overall order while items are the individual products within any given order. There are different parameters for both options which you can explore in the guide provided above.
3. You can then add a transaction and a item (or as many as you would like) and complete the process by sending the information:
ga('ecommerce:send');
And that’s how you basically get ecommerce data into Google Analytics. Be sure to check out the complete guide by Google and let me know if you have any comments or questions in the comments below.
Tagged analytics


